
前言
怎么说呢,苦逼学习了一年的Glibc的利用,然而到现在很多大比赛当中,已经开始从user mode转移到kernel mode当中去了,为了不脱离大队伍,开始学习kernel pwn
Kernel ROP
一些前置的知识:内核保护机制
SMAP/SMEP(来自初号机师傅的文章)
SMAP(Supervisor Mode Access Prevention,管理模式访问保护)和SMEP(Supervisor Mode Execution Prevention,管理模式执行保护)的作用分别是禁止内核访问用户空间的数据和禁止内核执行用户空间的代码。arm里面叫PXN(Privilege Execute Never)和PAN(Privileged Access Never)。SMEP类似于前面说的NX,不过一个是在内核态中,一个是在用户态中。和NX一样SMAP/SMEP需要处理器支持,可以通过cat /proc/cpuinfo查看,在内核命令行中添加nosmap和nosmep禁用。windows系统从win8开始启用SMEP,windows内核枚举哪些处理器的特性可用,当它看到处理器支持SMEP时通过在CR4寄存器中设置适当的位来表示应该强制执行SMEP,可以通过ROP或者jmp到一个RWX的内核地址绕过。linux内核从3.0开始支持SMEP,3.7开始支持SMAP。
在没有SMAP/SMEP的情况下把内核指针重定向到用户空间的漏洞利用方式被称为ret2usr。physmap是内核管理的一块非常大的连续的虚拟内存空间,为了提高效率,该空间地址和RAM地址直接映射。RAM相对physmap要小得多,导致了任何一个RAM地址都可以在physmap中找到其对应的虚拟内存地址。另一方面,我们知道用户空间的虚拟内存也会映射到RAM。这就存在两个虚拟内存地址(一个在physmap地址 ,一个在用户空间地址)映射到同一个RAM地址的情况。也就是说,我们在用户空间里创建的数据,代码很有可能映射到physmap空间。基于这个理论在用户空间用mmap()把提权代码映射到内存,然后再在physmap里找到其对应的副本,修改EIP跳到副本执行就可以了。因为physmap本身就是在内核空间里,所以SMAP/SMEP都不会发挥作用。这种漏洞利用方式叫ret2dir。
简单来讲就是隔离了内核和用户空间,内核没法访问或者执行用户空间的代码
Stack protector
个人简单理解为用户态下的Canary吧
Kernel Address Display Restriction(来自初号机师傅的文章
在linux内核漏洞利用中常常使用commit_creds和prepare_kernel_cred来完成提权,它们的地址可以从/proc/kallsyms中读取。从Ubuntu 11.04和RHEL 7开始,/proc/sys/kernel/kptr_restrict被默认设置为1以阻止通过这种方式泄露内核地址。(非root用户不可读取)。一般来说,我们都是在启动脚本中将权限提升到root,以方便从/proc/kallsyms读取commit_creds和prepare_kernel_cred的地址。
KALSR
内核地址随机化,类似于用户态的alsr,非默认开始。
KPTI
KPTI即内核页表隔离(Kernel page-table isolation),内核空间与用户空间分别使用两组不同的页表集,这对于内核的内存管理产生了根本性的变化
需要进行说明的是,在这两张页表上都有着对用户内存空间的完整映射,但在用户页表中只映射了少量的内核代码(例如系统调用入口点、中断处理等),而只有在内核页表中才有着对内核内存空间的完整映射,但两张页表都有着对用户内存空间的完整映射 。
内核中获得flag的方式
提权,即是将当前进程的权限变更为root,一般调用 commit_creds(prepare_kernel_cred(0))完成提权然后用户态“着陆”起shell。
进程权限管理(这里照搬了arttnba3师傅的博客 )
进程描述符(process descriptor)
在内核中使用结构体 task_struct 表示一个进程,该结构体定义于内核源码include/linux/sched.h中,代码比较长就不在这里贴出了
一个进程描述符的结构应当如下图所示:
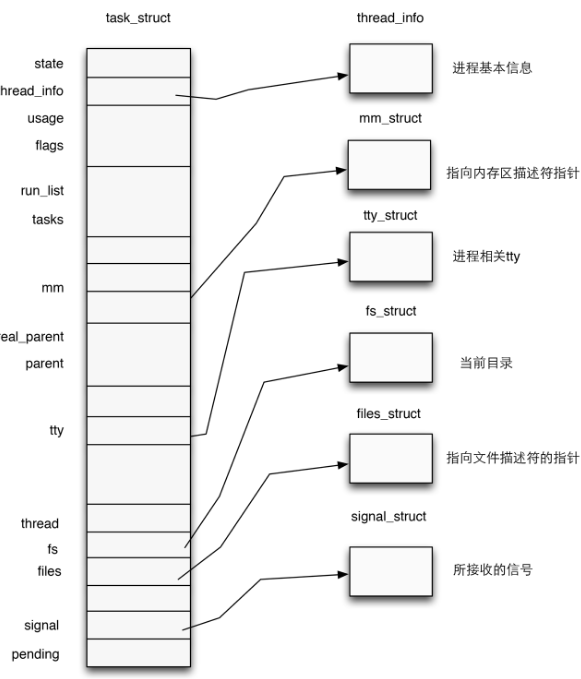
本篇我们主要关心其对于进程权限的管理
注意到task_struct的源码中有如下代码:
1 | /* Process credentials: */ |
Process credentials 是 kernel 用以判断一个进程权限的凭证,在 kernel 中使用 cred 结构体进行标识,对于一个进程而言应当有三个 cred:
- ptracer_cred:使用
ptrace系统调用跟踪该进程的上级进程的cred(gdb调试便是使用了这个系统调用,常见的反调试机制的原理便是提前占用了这个位置) - real_cred:即客体凭证(objective cred),通常是一个进程最初启动时所具有的权限
- cred:即主体凭证(subjective cred),该进程的有效cred,kernel以此作为进程权限的凭证
进程权限凭证:cred结构体
对于一个进程,在内核当中使用一个结构体cred管理其权限,该结构体定义于内核源码include/linux/cred.h中,如下:
1 | struct cred { |
用户ID & 组ID
一个cred结构体中记载了一个进程四种不同的用户ID:
- 真实用户ID(real UID):标识一个进程启动时的用户ID
- 保存用户ID(saved UID):标识一个进程最初的有效用户ID
- 有效用户ID(effective UID):标识一个进程正在运行时所属的用户ID,一个进程在运行途中是可以改变自己所属用户的,因而权限机制也是通过有效用户ID进行认证的,内核通过 euid 来进行特权判断;为了防止用户一直使用高权限,当任务完成之后,euid 会与 suid 进行交换,恢复进程的有效权限
- 文件系统用户ID(UID for VFS ops):标识一个进程创建文件时进行标识的用户ID
在通常情况下这几个ID应当都是相同的
用户组ID同样分为四个:真实组ID、保存组ID、有效组ID、文件系统组ID,与用户ID是类似的,这里便不再赘叙
进程权限改变
前面我们讲到,一个进程的权限是由位于内核空间的cred结构体进行管理的,那么我们不难想到:只要改变一个进程的cred结构体,就能改变其执行权限
在内核空间有如下两个函数,都位于kernel/cred.c中:
struct cred* prepare_kernel_cred(struct task_struct* daemon):该函数用以拷贝一个进程的cred结构体,并返回一个新的cred结构体,需要注意的是daemon参数应为有效的进程描述符地址或NULLint commit_creds(struct cred *new):该函数用以将一个新的cred结构体应用到进程
*提权
查看prepare_kernel_cred()函数源码,观察到如下逻辑:
1 | struct cred *prepare_kernel_cred(struct task_struct *daemon) |
在prepare_kernel_cred()函数中,若传入的参数为NULL,则会缺省使用init进程的cred作为模板进行拷贝,即可以直接获得一个标识着root权限的cred结构体
那么我们不难想到,只要我们能够在内核空间执行commit_creds(prepare_kernel_cred(NULL)),那么就能够将当前进程的权限提升到root
状态保存(依旧照搬 arttnba3师傅博客)
通常情况下,我们的exploit需要进入到内核当中完成提权,而我们最终仍然需要着陆回用户态以获得一个root权限的shell,因此在我们的exploit进入内核态之前我们需要手动模拟用户态进入内核态的准备工作——保存各寄存器的值到内核栈上,以便于后续着陆回用户态
通常情况下使用如下函数保存各寄存器值到我们自己定义的变量中,以便于构造 rop 链:
算是一个通用的pwn板子
方便起见,使用了内联汇编,编译时需要指定参数:
-masm=intel
这是intel的
1 | size_t user_cs, user_ss, user_rflags, user_sp; |
这是AT&T的
1 | void save_stats() { |
返回用户态
swapgs指令恢复用户态GS寄存器sysretq或者iretq恢复到用户空间
那么我们只需要在内核中找到相应的gadget并执行swapgs;iretq就可以成功着陆回用户态
通常来说,我们应当构造如下rop链以返回用户态并获得一个shell:
2
3
4
5
6
7
iretq
user_shell_addr
user_cs
user_eflags //64bit user_rflags
user_sp
user_ss
但是当开启了KPTI保护时,就需要
2
3
4
5
6
7
8
0 // padding
0 // padding
user_shell_addr
user_cs
user_rflags
user_sp
user_ss
补充一点,在寻找iretq这个gadget的时候,不一定要iretq;ret,因为这个时候已经返回了用户态,而之前就已经保存了rip了,现在只需要将栈上rip的位置布置为system(“/bin/sh”)即可
iretq的栈布局如下(来自初号机师傅的文章)
1 | |----------------------| |
调试等一些其他问题解决
首先是启动脚本,给出一个例子,参考arttnba3师傅的脚本
1 |
|
部分参数说明如下:
-m:虚拟机内存大小-kernel:内存镜像路径-initrd:磁盘镜像路径-
-append:附加参数选项 nokalsr:关闭内核地址随机化,方便我们进行调试rdinit:指定初始启动进程,/sbin/init进程会默认以/etc/init.d/rcS作为启动脚本,这里也可以不要这个,直接写一个init脚本。loglevel=3&quiet:不输出logconsole=ttyS0:指定终端为/dev/ttyS0,这样一启动就能进入终端界面-monitor:将监视器重定向到主机设备/dev/null,这里重定向至null主要是防止CTF中被人给偷了qemu拿flag-cpu:设置CPU安全选项,在这里开启了smep保护,同样的还有smap保护-s:相当于-gdb tcp::1234的简写(也可以直接这么写),后续我们可以通过gdb连接本地端口进行调试
通常当我们自己起一个内核环境时,需要配置一些例如用户组等信息,这里采用了busybox构建磁盘镜像
大致如下操作…
1 | mkdir -p proc sys dev etc/init.d |
然后 创建 init 作为 linux 的启动脚本,内容为 (参考ctfwiki)
1 | #!/bin/sh |
以下同样参考arttnba3师傅
1 | #!/bin/sh |
然后是配置用户组
1 | $ echo "root:x:0:0:root:/root:/bin/sh" > etc/passwd |
打包解压镜像文件
使用如下命令打包
1 | find . | cpio -o -H newc > ./rootfs.cpio |
1 | find . | cpio -o --format=newc > ./rootfs.cpio |
解压
1 | cpio -idv < ./rootfs.cpio |
gdb调试exploit、内核
如果比赛题中给出了vmlinux文件,那么按照如下步骤解决
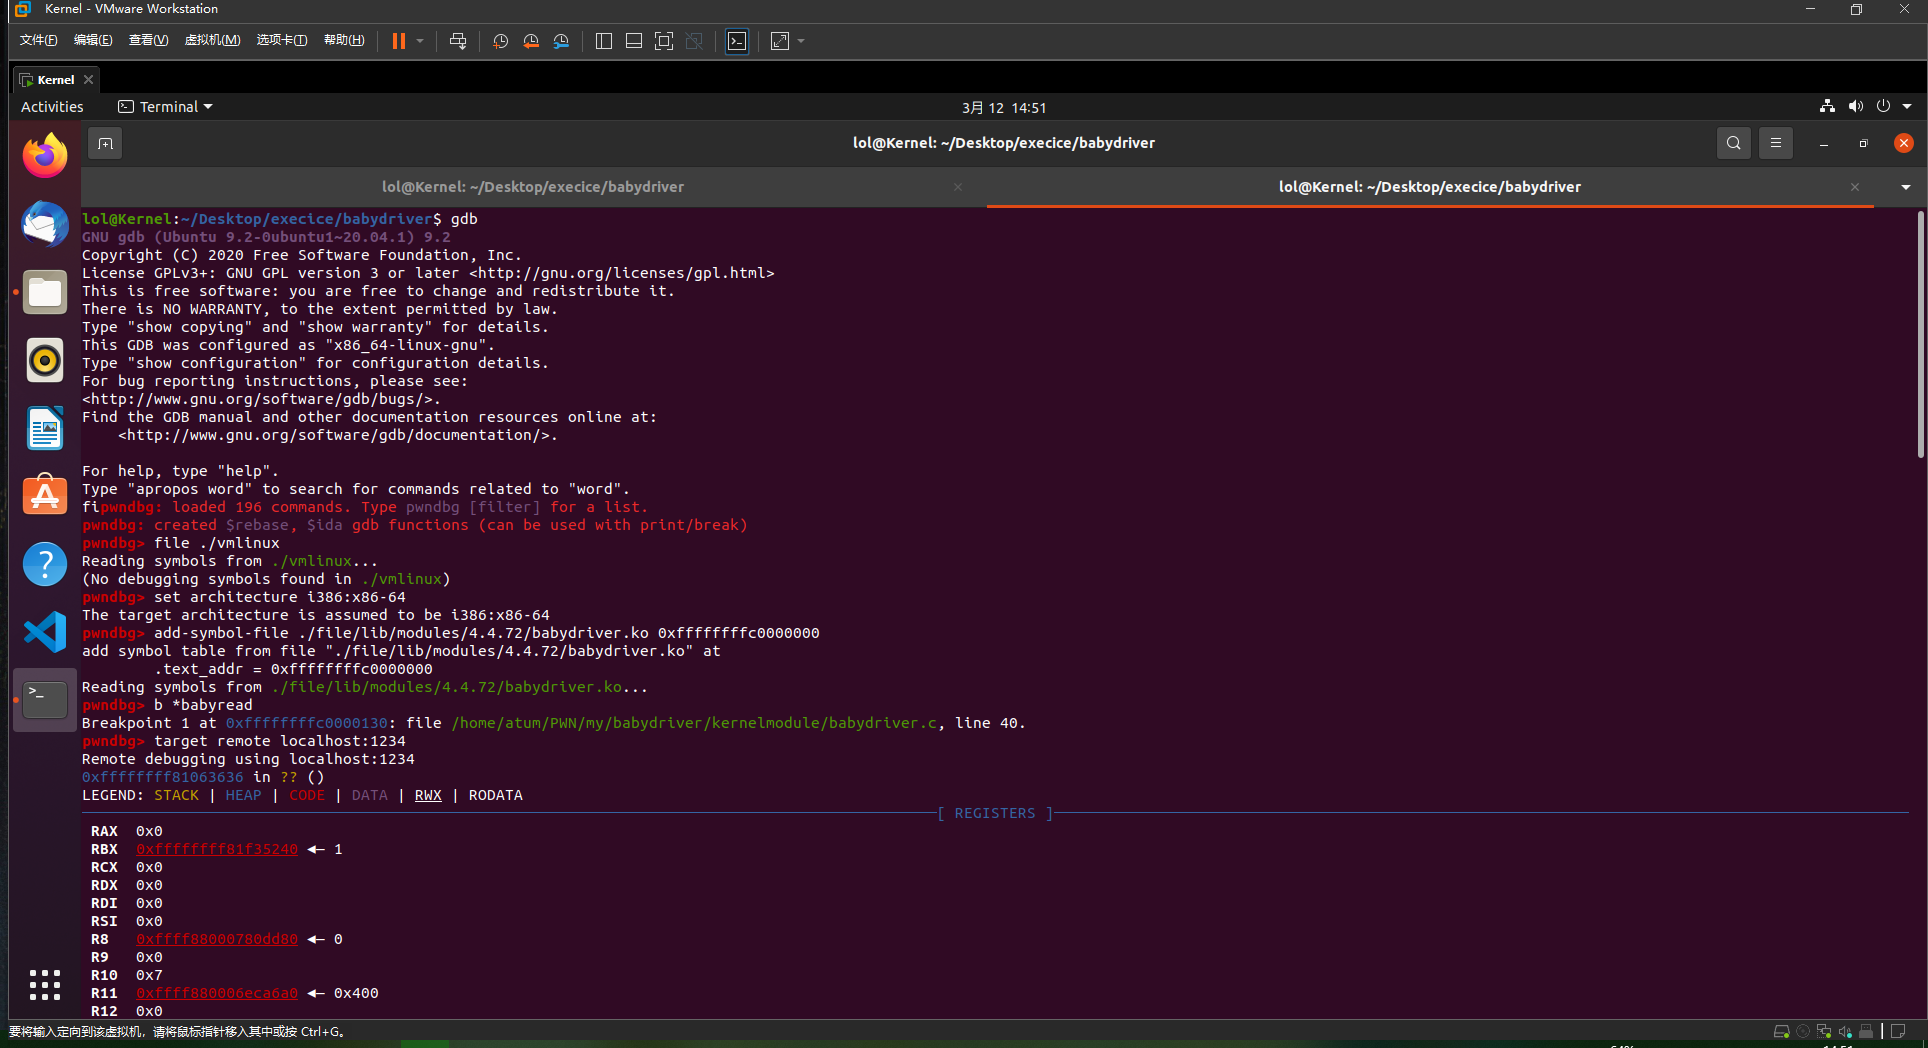
简单说明一下
- 首先加载vmlinux
- set architecture i386:x86-64设置架构
- add-symbol-file(加载驱动符号表) ./驱动的具体为找 xx.ko 0xffffffffc0000000(后面这个是驱动的text段的起始地址),可以通过cat /sys/module/babydriver/sections/.text 查询,也可以通过lsmod查看
- b *babyread,第三步中加载的驱动中的函数下断点
- 通过targe remote localhost:1234连接
- gdb中键入C执行,回到内核中运行exploit即可成功断点
补充
当题目中没有给出vmlinux文件时,可以通过**extract-vmlinux**来提取
1 | ./extract-vmlinux ./bzImage > vmlinux |
源码
1 |
|
提取gadget,这里可以用ROPgadget、ropper、objdump等提取
1 | ROPgadget --binary ./vmlinux > gadget.txt |
例题:强网杯2018 - core
这里还有些前置知识,就不一一做列举了。
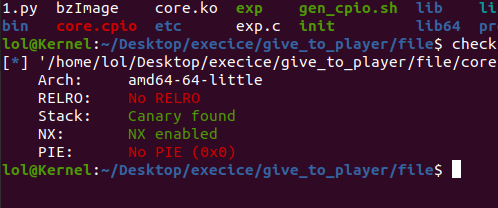
保护
init函数
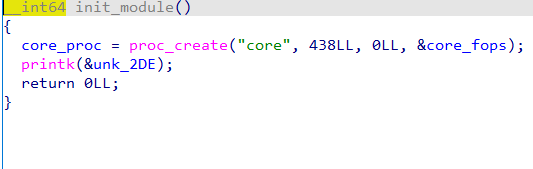
创建了一个进程节点文件/proc/core,也是后续我们跟该内核模块通信的媒介
ioctl函数
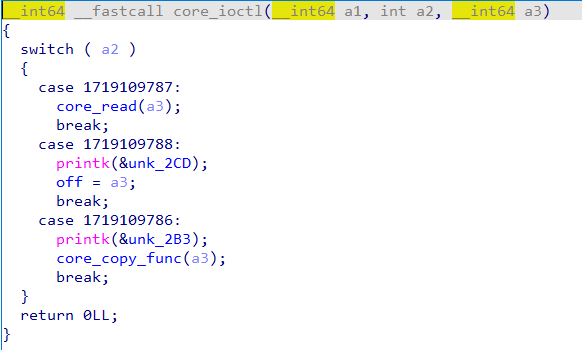
不同的参数可以分别调用三个操作,其中off是全局变量(.bss)
read函数
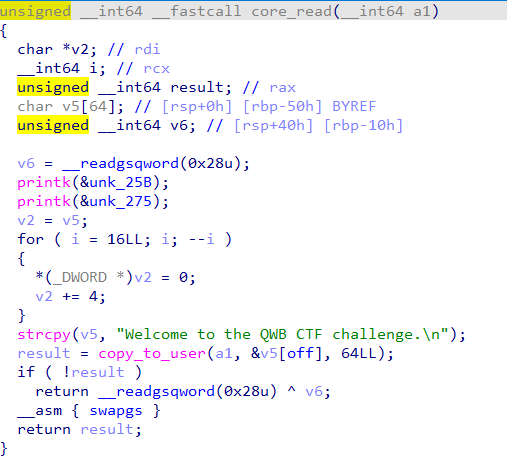
在copy_to_user中,将v5[off]偏移处开始,长度为64的内容读入到了用户的参数a1当中去,而这里off我们能够控制,而程序开启了Canary,通过这里可以将canary泄露出来
write函数
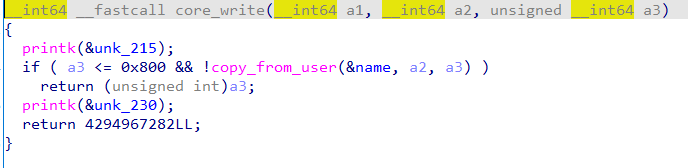
这里name是全局变量,在copy_from_user中,从用户输入a2中读取长度为a3到name当中去
func函数
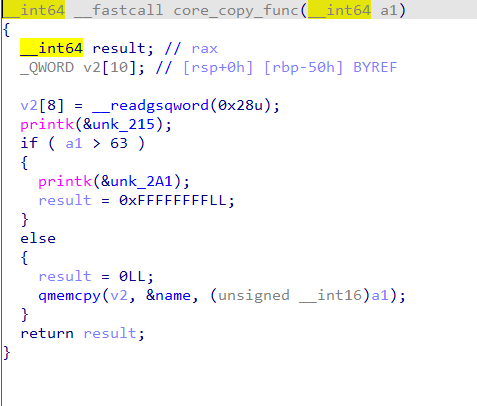
在该函数中,qmemcpy,从name中读取长度为a1进入栈上变量v2当中去,这里a1由用户传入时是int64,而在qmemcpy当中值的类型变成了int16。
思路(以下来自Lantern师傅)
- 通过 ioctl 设置 off, 然后通过 core_read () leak 出 canary
- 通过 core_write () 向 name 写,构造 ropchain
- 通过 core_copy_func () 从 name 向局部变量上写,通过设置合理的长度和 canary 进行 rop
- 通过 rop 执行
commit_creds(prepare_kernel_cred(0)) - 返回用户态,通过 system (“/bin/sh”) 等起 shell
exploit
1 |
|
参考文章
https://lantern.cool/note-pwn-kernel-rop/#get-root-shell
https://github.com/torvalds/linux/blob/master/scripts/extract-vmlinux
https://bbs.pediy.com/thread-262425.htm
https://mask6asok.top/2020/02/06/Linux_Kernel_Pwn_1.html#exploit
https://ctf-wiki.org/pwn/linux/kernel-mode/environment/qemu-emulate/
- 本文标题:Kernel Pwn ROP
- 本文作者:LOLOLO
- 创建时间:2022-03-12 18:53:00
- 本文链接:https://lololo-pwn.github.io/2022/03/12/Kernel-Pwn-ROP/
- 版权声明:本博客所有文章除特别声明外,均采用 BY-NC-SA 许可协议。转载请注明出处!